
Save OpenAI Chats to OrbisDB on Ceramic (Tutorial)
Build an AI-powered chatbot using OrbisDB for storage and the OpenAI API.

Last year we partnered with Learn Web 3 (a free educational platform for Web3 developers) to publish a tutorial on Saving OpenAI Chats to ComposeDB on Ceramic to showcase an easy-to-understand design architecture and how ComposeDB could be leveraged for storage. In that example we showed how to configure and deploy a local ComposeDB/Ceramic node, walking through data model design, server configurations, model deployment, and runtime definition generation, all of which are necessary steps a developer must undergo before running the application locally.
But what if developers could bypass local node configuration altogether and start testing their database design and application logic immediately? What if they could do so with the assurances of no lock-ins, and the open option to move to a self-hosted configuration in the future? And finally, what if they could benefit from all of these things while enjoying a seamless developer experience that makes storage setup easy?
That's where OrbisDB comes in.
What is OrbisDB?
OrbisDB is an advanced decentralized database built on the Ceramic Network and offers an ORM-like interface that developers can leverage when integrating the OrbisDB SDK. Developers who have worked with Prisma or Drizzle with a Postgres instance will find this experience familiar and exceedingly easy to work with.
As for developer experience, what sets OrbisDB apart are the following:
- A user interface (UI) developers can run either locally or using a hosted Studio instance, bypassing the need to define and deploy data models by hand (which is still an option if using the SDK). The UI also includes data visualization (you can view data relevant to your applications in table format), as well as other views for configuring add-ons like plugins (described below).
- OrbisDB offers the option to leverage a variety of a growing list of plugins to enrich the data capabilities developers can incorporate into their application logic. Some example plugins offer gating ability, automatic resolution of ENS domains, sybil resistance, and more. Anyone can also build plugins and incorporate them immediately in the event they're running a standalone instance.
- The OrbisDB SDK wraps user authentication, client creation, schema creation (if developers prefer not to use the UI), and querying all under one roof, therefore simplifying the list of dependencies developers need to worry about.
- Finally, OrbisDB offers the option to run an instance locally (similar to the ComposeDB tutorial mentioned above), or on a shared (hosted) instance. This is a significant feature for overall development and testing velocity as it lets developers start writing and reading data right away without having to worry about node configuration. Once developers are ready to take their application to production after testing on the shared instance, setting up a self-hosted (standalone) instance is straightforward.
For this tutorial, we will be leveraging the hosted Studio instance to both define our data models and utilize a shared OrbisDB instance.
Let's Get Started!
Before we get started, you will need the following dependencies:
- MetaMask Chrome Extension (or similar browser wallet for authentication)
- Node v20
- An OpenAI API key
- A project ID you will need from WalletConnect
- A free OrbisDB Studio account - first, log in with your browser wallet. We will use this later to define our data models and obtain a context and environment ID
Initial Setup
First, clone the repository and install the dependencies:
git clone https://github.com/ceramicstudio/orbisdb-chatbot && cd orbisdb-chatbot
npm install
Next, create a copy of the example env file in your root directory:
cp .env.example .envVisit OpenAI Signup page to create an account if you don't yet have one and generate an API key. OpenAI offers a free OpenAI API trial, with $5 worth of credit (which can take you a LONG way). Go ahead and assign your new API key to OPENAI_API_KEY in your new .env file.
Navigate to WalletConnect and create a free account and a new project (with a name of your choosing and the App type selected). Copy the resulting project ID and assign it as the value for NEXT_PUBLIC_PROJECT_ID .
OrbisDB Setup
If you're logged into your OrbisDB Studio account, we can start connecting our application to a shared OrbisDB instance.
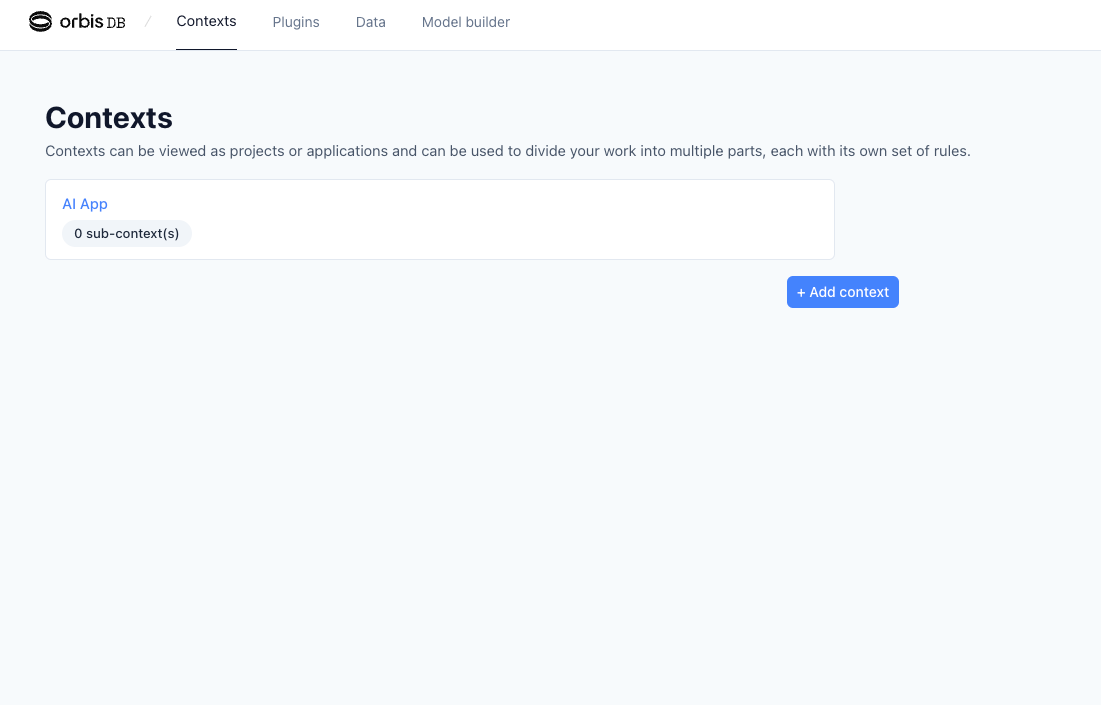
First, you will need to define a new context. Contexts are a Ceramic-native feature exposed in all data management methods, and make it easy for developers to organize data across different applications or projects (there is also the option to leverage sub-contexts, but we'll save this for a future tutorial).
Go ahead and click "+ Add context" within your root studio view - feel free to give your new context a name and description of your choosing:
If you click into your new context you can view its corresponding ID:
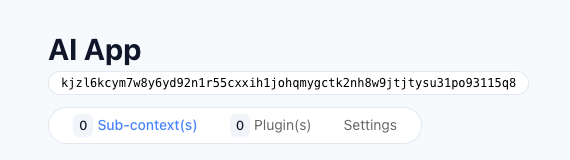
Go ahead and copy this value and assign it to NEXT_PUBLIC_CONTEXT_ID in your .env file.
On the right-hand side, you should also see details about your setup:
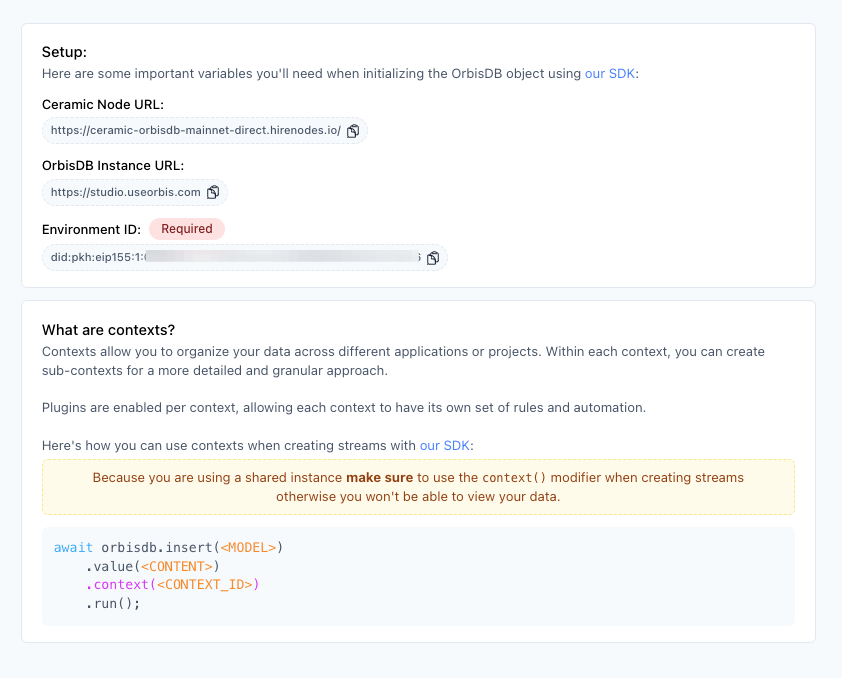
Copy the value found under "Environment ID" and assign it to NEXT_PUBLIC_ENV_ID in your .env file. This ID is required to identify you when using the shared OrbisDB instance.
You will also see the endpoints for the shared Ceramic and OrbisDB instances in the same section. No need to copy these values as they are already hard-coded into the repository.
Defining Data Models
We will also use the Studio UI to define the data models our application needs. This demo application utilizes two simple data models found within the tables file in our repository:
posts- this will contain each message within our conversation exchange. The "body" field will house the message itself, while the "tag" field will keep track of who the message came from (user vs. bot). This model will use the "List" account relation, which means an authenticated account can have an unbounded amount of instance documents that fall under this definition.profiles- this model will allow us to assign additional data to ourselves and our chatbot, including a name, username, and fun emoji. The "actor" subfield will be used to differentiate between the user (using the value "human"), and your chatbot (using the value "robot"). In contrast to posts, this model will use the "Set" account relation based on the "actor" subfield, which means an account can have exactly 1 instance document given a value assigned to "actor". For example, this ensures that our application won't allow us to accidentally create >1 document with an "actor" subfield matching "human".
To start creating the models, navigate to "Model builder" from the Studio navigation. You can start by defining your "posts" table. After clicking "Create Model" you will be able to view the model ID:
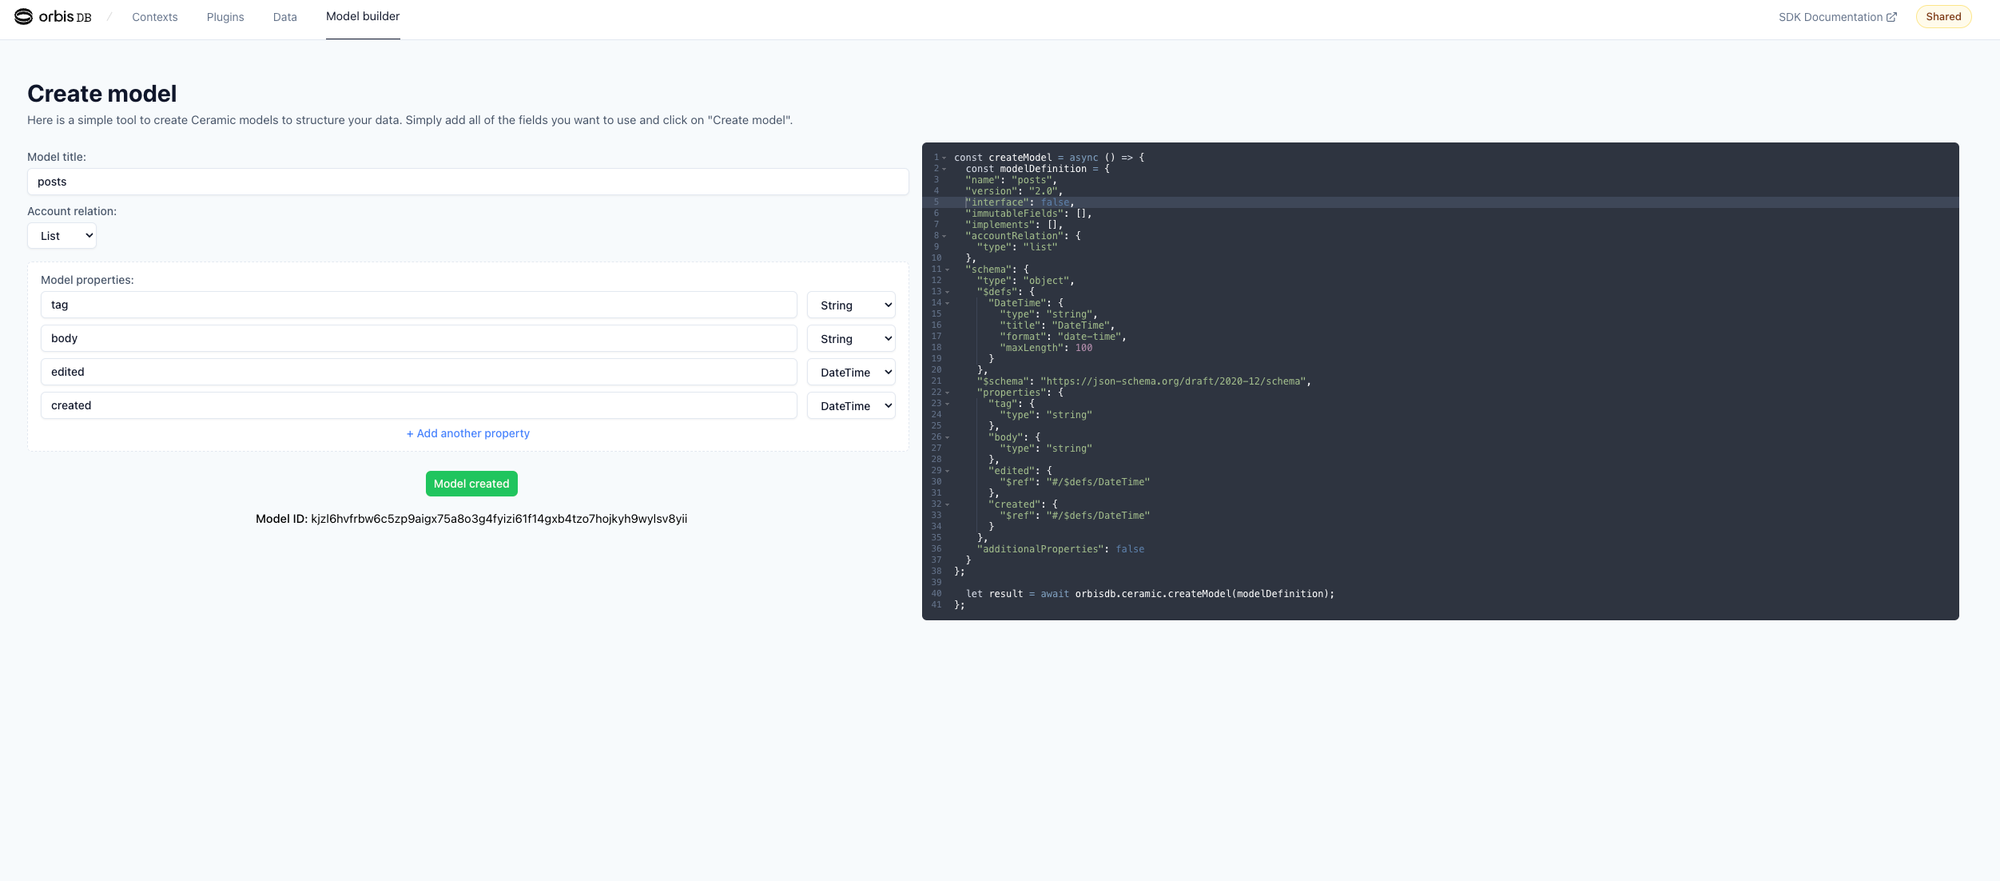
Copy this value and assign it to NEXT_PUBLIC_POST_ID in your .env file.
Go through the same steps for your "profiles" table. However, be sure to select the "Set" option under "Account relation". Copy the resulting model ID and assign it to NEXT_PUBLIC_PROFILE_ID in your .env file.
Application Architecture
As mentioned above, the OrbisDB SDK makes it easy to instantiate clients, authenticate users, and run queries using the same library. As you'll note in the application repository, there are various components that need to be able to access the state of the authenticated user. While we're wrapping all components of our application within a WagmiConfig contextual wrapper (which will allow us to leverage Wagmi's hooks to see if a user's wallet is connected - learn more about this in our WalletConnect Tutorial), we also need a way to know if the user has an active OrbisDB session.
While there are multiple ways to facilitate this, our application uses Zustand for state management to circumvent the need for contextual wrappers or prop drilling.
If you take a look at the store file you can see how we've set up four state variables (two of which are methods) and incorporated the OrbisDB SDK to authenticate users and alter the state of orbisSession:
type Store = {
  orbis: OrbisDB;
  orbisSession?: OrbisConnectResult | undefined;
  // setOrbisSession returns a promise
  setAuth: (
    wallet: GetWalletClientResult | undefined
  ) => Promise<OrbisConnectResult | undefined>;
  setOrbisSession: (session: OrbisConnectResult | undefined) => void;
};

const StartOrbisAuth = async (
  walletClient: GetWalletClientResult,
  orbis: OrbisDB
): Promise<OrbisConnectResult | undefined> => {
  if (walletClient) {
    const auth = new OrbisEVMAuth(window.ethereum!);

    // This option authenticates and persists the session in local storage
    const authResult: OrbisConnectResult = await orbis.connectUser({
      auth,
    });
    if (authResult.session) {
      console.log("Orbis Auth'd:", authResult.session);
      return authResult;
    }
  }

  return undefined;
};

const useStore = create<Store>((set) => ({
  orbis: new OrbisDB({
    ceramic: {
      gateway: "https://ceramic-orbisdb-mainnet-direct.hirenodes.io/",
    },
    nodes: [
      {
        gateway: "https://studio.useorbis.com",
        env: ENV_ID,
      },
    ],
  }),
  orbisSession: undefined,
  setAuth: async (wallet) => {
    if (wallet) {
      try {
        const auth = await StartOrbisAuth(wallet, useStore.getState().orbis);
        set((state: Store) => ({
          ...state,
          orbisSession: auth,
        }));
        return auth;
      } catch (err) {
        console.error(err);
      }
    } else {
      set((state: Store) => ({
        ...state,
        session: undefined,
      }));
    }
  },
  setOrbisSession: (session) =>
    set((state: Store) => ({
      ...state,
      orbisSession: session,
    })),
}));
As you can see, we've hard-coded the Ceramic and OrbisDB gateways, whereas we've imported our environment ID that we previously assigned as an environment variable.
Our navbar component sits at the same or greater level as all of our child components and includes our Web3Modal widget. You can see how we're using a useEffect hook to check if our session is active and either set our "loggedIn" state variable as true or false. This result determines if we generate a new session for the user by leveraging our setAuth method from our Zustand store, or if we simply set our orbisSession as the value of our valid active session.
Back in the home page component you can see how we're conditionally rendering our MessageList child component based on whether we have both an active orbis session AND the user's wallet is connected (allowing us to access their address).
Reading Data
The message list and userform component files are responsible for performing the majority of writes and reads to OrbisDB. If you navigate to the message list component for example, take a look at how we've imported our client-side environment variables to identify our post and profile models, as well as our context ID. When this component is rendered, the useEffect hook first invokes the "getProfile" method:
  const getProfile = async (): Promise<void> => {
    try {
      const profile = orbis
        .select("controller", "name", "username", "emoji", "actor")
        .from(PROFILE_ID)
        .where({ actor: ["human"] })
        .context(CONTEXT_ID);
      const profileResult = await profile.run();
      if (profileResult.rows.length) {
        console.log(profileResult.rows[0]);
        setProfile(profileResult.rows[0] as Profile);
      } else {
        // take the user to the profile page if no profile is found
        window.location.href = "/profile";
      }
      await getRobotProfile(profileResult.rows[0] as Profile);
    } catch (error) {
      console.error(error);
      return undefined;
    }
  };
Notice how we've constructed a .select query off of our OrbisDB instance (provided by our Zustand store), asking for the corresponding values for the 5 columns we want data for.
Next, we need to notate which data model we want our query to reference, which is where we use .from with our profile model ID as the value.
We also only want the records where the profile is for the human user, indicated on the following line.
Finally, we use the context ID that corresponds to this project as the final value that's appended to the query.
If a corresponding profile exists, we then invoke the getRobotProfile method to obtain our chatbot's information. If it does not exist, we take the users to the profiles page so they can create one.
Writing Data
Let's take a quick look at an example of data mutations. Within the same message list component you will find a method called createPost which is invoked each time the user creates a new message:
 const createPost = async (
    thisPost: string
  ): Promise<PostProps | undefined> => {
    try {
      await orbis.getConnectedUser();
      const query = await orbis
        .insert(POST_ID)
        .value({
          body: thisPost,
          created: new Date().toISOString(),
          tag: "user",
          edited: new Date().toISOString(),
        })
        .context(CONTEXT_ID)
        .run();

      if (query.content && profile) {
        const createdPost: PostProps = {
          id: query.id,
          body: query.content.body as string,
          profile,
          tag: query.content.tag as string,
          created: query.content.created as string,
          authorId: query.controller,
        };
        return createdPost;
      }
    } catch (error) {
      console.error(error);
      return undefined;
    }
  };
While this looks similar to the syntax we use to read data, there are a few differences.
First, take a look at the first line under the "try" statement - we're calling getConnectedUser() off of our OrbisDB prototype chain to ensure that our active session is applied. This is necessary to run mutation queries, whereas it's not a necessary step for reading data.
You can also see that we've swapped out the .select and .from statements for .insert which references the model ID we want to use, thus creating a new row in the corresponding table.
Finally, we're referencing the user's message value for the body while ensuring we tag the message as coming from the "user" before running the query and checking on its success status.
Running the Application in Developer Mode
We're now ready to boot up our application!
In your terminal, go ahead and start the application in developer mode:
nvm use 20
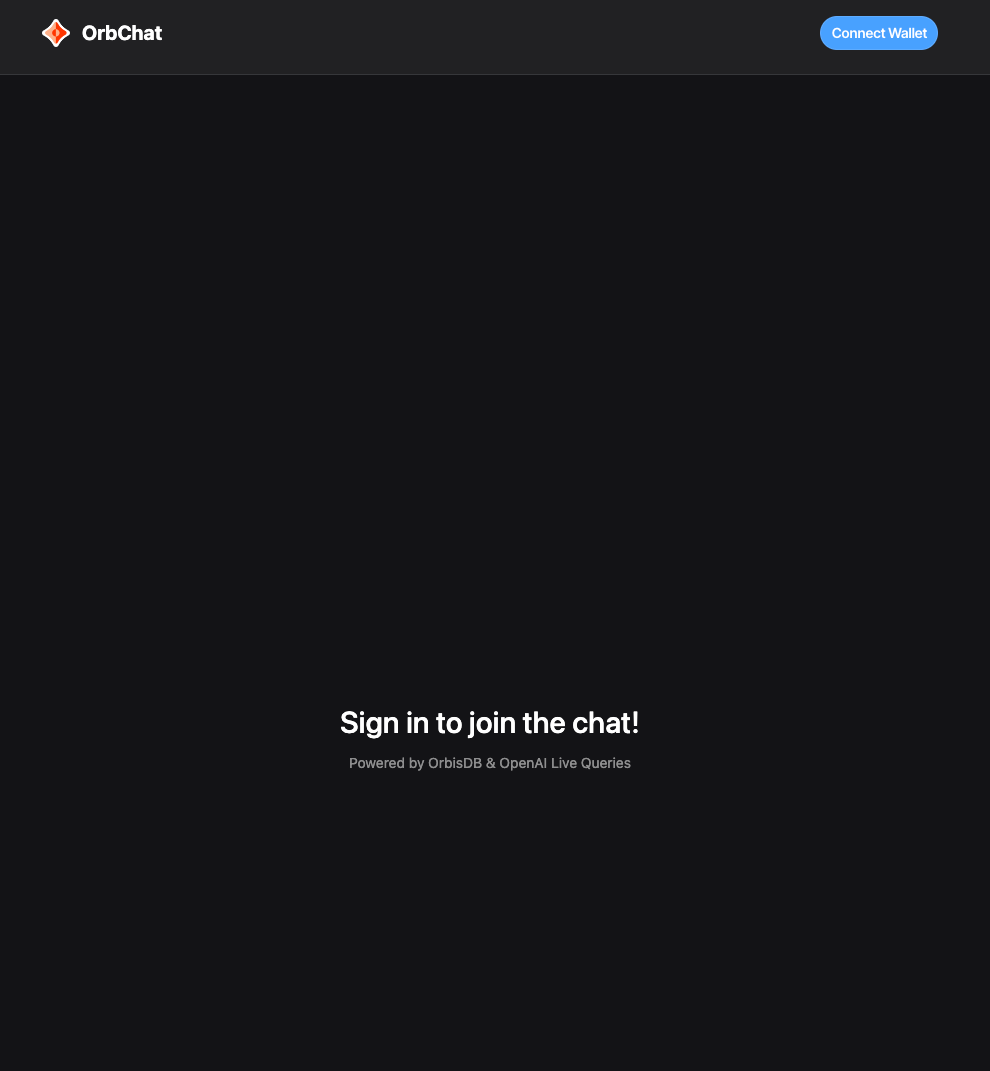
npm run devNavigate to http://localhost:3000/ in your browser. You should see the following:
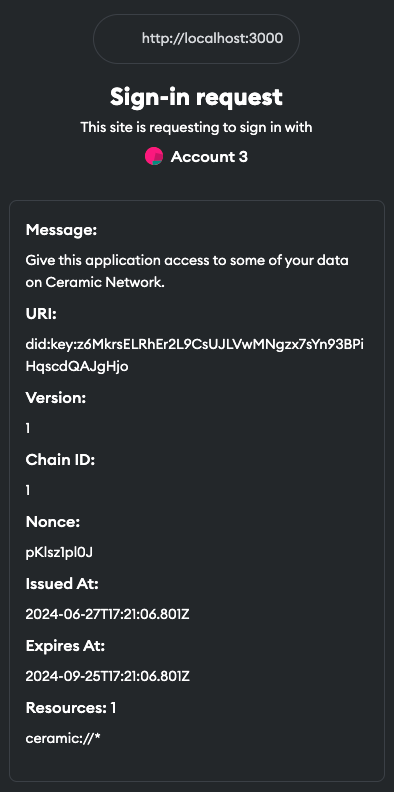
Go ahead and click on "Connect Wallet." You should see a secondary authentication message appear after you connect your wallet:
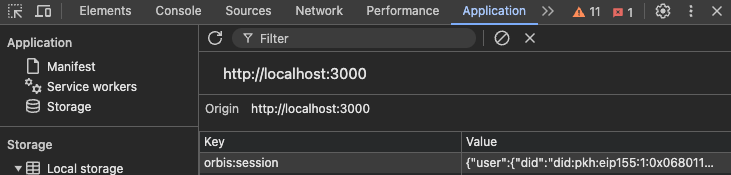
Signing this message creates an authenticated session (using orbis.connectUser() from our Zustand store). You can check the value of this session by navigating to the "Application" tab in your browser and looking for the orbis:session key pair:
Given that you have not yet created any messages, the application should automatically direct you to the /profiles page where you can assign identifiers to yourself and your chatbot:
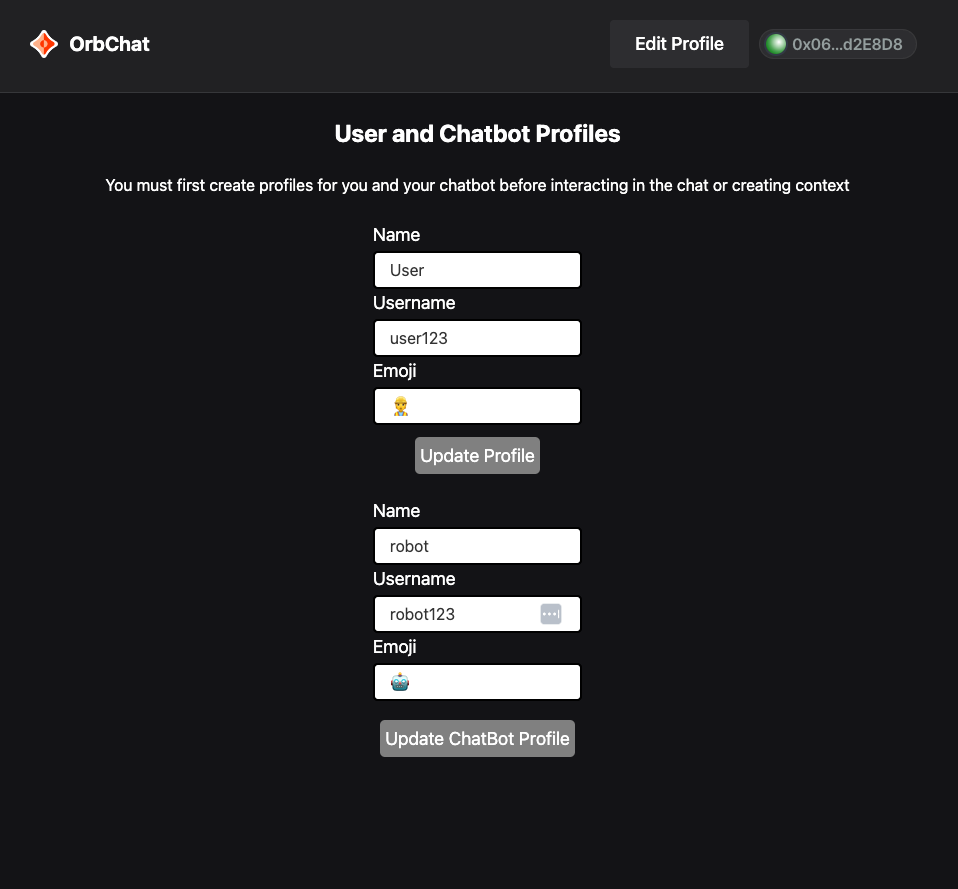
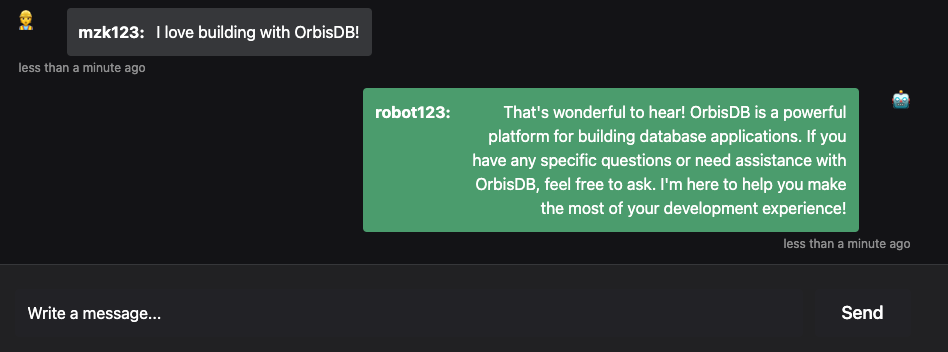
Finally, navigate back to the homepage to begin exchanging messages with your chatbot. Notice how the values from your corresponding profiles appear next to the messages:
How Could this Application be Improved?
Since our message history is being written and queried based on static values (for example, assigning messages to the "user" tag), you'll notice that the same conversation history appears when self-authenticating with a different wallet address and creating a new session.
As a challenge, try thinking about how to implement different ways to improve the application design to improve this experience:
- Tagging the profiles and messages with values that align with actual authenticated accounts instead of static ones
- Altering our message data model and application to accommodate different chat contexts, allowing a user to have different conversation histories
Next Steps
We hope you've enjoyed this tutorial and learned something new about how to configure and incorporate OrbisDB into your application! While this concludes our walk-through, there are other possibilities Ceramic has to offer: